- Why You Should Build a Custom MVP ?
- Bonus Tips for MVP Success
- Your MVP Journey Starts Here
- Frequently Asked Questions (FAQs)
Table of Contents
Step by Step Guide To Develop Custom MVP Product


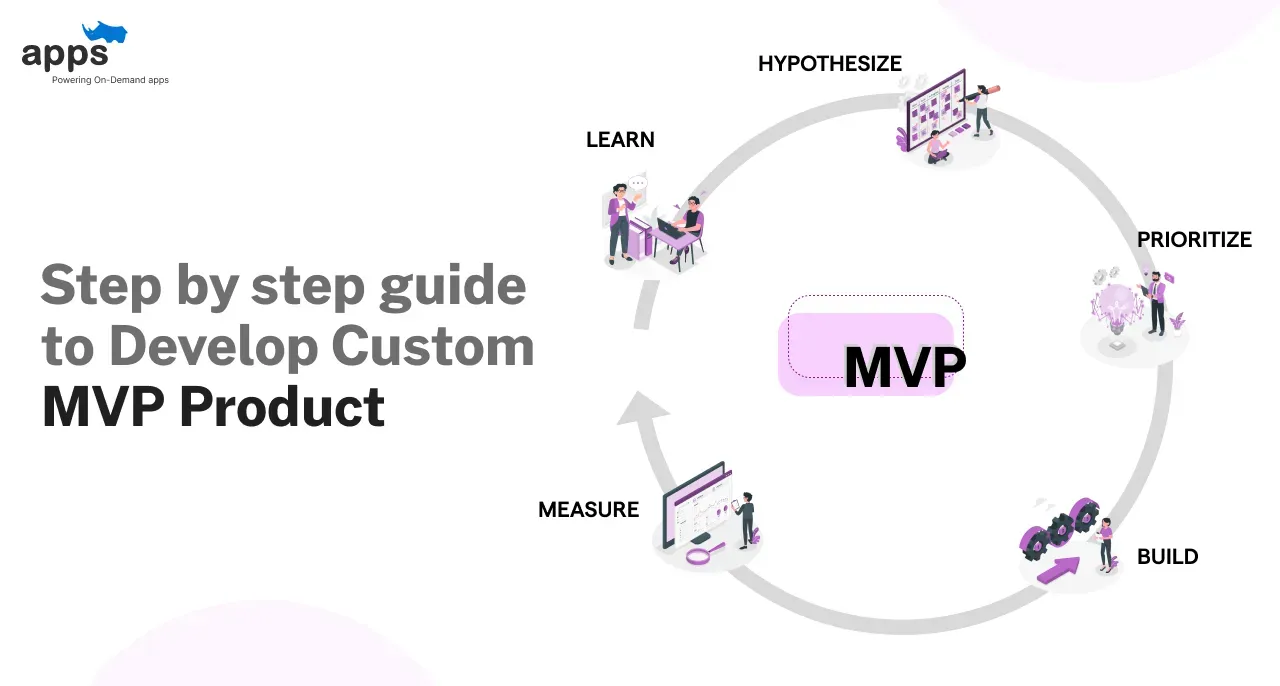
A Minimum Viable Product (MVP) is the most streamlined version of your product that still delivers meaningful value to users. It's not a mockup or a beta, but it's a real, working solution with just enough features to solve a core problem.
The purpose is simple: get your idea into users' hands quickly, test your assumptions, and learn what works.
To develop custom MVP products means committing to this mindset: reduce noise and increase value. According to Startup Genome, startups that iterate based on MVP feedback grow 1.5x faster than those that don't.
The MVP approach is a data-first, low-risk path to market validation.
But it's not an excuse for bugs or poor usability. An MVP still needs to work well; it doesn't need every feature.
Why You Should Build a Custom MVP ?
When you develop custom MVP products, you're not just launching fast. You're launching smart.
A custom MVP is built specifically for your idea, users, and business goals instead of relying on generic templates or feature sets.
You save time by avoiding unnecessary development. You save money by skipping irrelevant features. You can also gather focused feedback from the right users early on.
Here's why building a custom MVP is a smart strategy:
It helps prioritize mission-critical features: Instead of building every idea at once, you strip your concept down to the essentials.
For instance, a food delivery MVP might launch with browsing, ordering, and checkout—no loyalty points, chatbots, or AR menu previews.
It allows for faster deployment and quicker iterations: When the product is simple, the development is faster.
With shorter sprints and fewer bugs, you can respond to feedback quickly. Teams that develop custom MVP products typically push updates within weeks, not months.
It avoids bloated tools or generalized assumptions: Don't waste resources integrating tools built for entirely different industries.
Instead, use tech that speaks directly to your audience's context. Say, medical scheduling for clinics or live location tracking for logistics apps.
It improves stakeholder confidence: A focused MVP shows investors and clients you know your market. You're not guessing, you're proving.
Early traction on a lean product sends a strong signal of product-market fit.
Custom MVPs also enable flexibility. If feedback shows your direction is slightly off, it's much easier to pivot without scrapping months of code.
That's the value of keeping your MVP custom, lean, and targeted.
The following are the essential steps you must follow to successfully develop custom MVP products that resonate with real users, adapt quickly, and scale confidently.

Step 1: Define the Problem
Your MVP should solve one real, specific problem. Identify a focused pain point: “Remote freelancers miss project deadlines due to unclear handoffs.”
This step is about clarity. Use user interviews, survey data, and competitor reviews to uncover genuine user frustration.
According to CB Insights, 42% of startups fail because there's no market need.
Write it out in one sentence:
"We are solving [this problem] for [this user] so they can [achieve this outcome]."
Once you identify the core problem, validate it with at least 10 users who fit your target audience. Ask them directly if this is something they experience and how they currently deal with it.
How they answer will give you insight into whether or not your solution works.
Avoid surface-level issues and look for recurring patterns. You're on the right track if three out of five potential users mention the same workaround or complaint.
This is the foundation on which you'll develop custom MVP products with real utility.
Step 2: Know Your Target Audience
To develop custom MVP products that succeed, you need to know exactly who you're building for. Create user personas.
Not just age and gender, but motivations, routines, pain points, and digital behavior.
For example:
- Name: Olivia
- Job: HR manager at a 100-person startup
- Problem: Tracks onboarding across spreadsheets and Slack
- Goal: Automate tasks and receive real-time update
Where does she face the problem?
At work, juggling 10 tools.
What's her current workaround?
Sending reminder emails.
What does she value?
Simplicity, visibility, and control.
Go beyond one persona. Build at least 2–3 if your MVP has multiple user roles (e.g., service provider and customer).
This dual perspective will help you build a balanced feature set.
Also, segment your audience by behavior. A tech-savvy startup founder and a nonprofit coordinator may need scheduling tools, but will use them differently.
Knowing these nuances allows you to shape your MVP accordingly.
Step 3: Map Out the Core Features
You've defined your user. Now, what do they need?
Resist the urge to add extras. MVPs are about the must-haves, not the could-haves. A good way to decide is with the MoSCoW framework
- Must have – The app won't work without this.
- Should have – Valuable, but can wait.
- Could have – Nice-to-haves, maybe later.
- Won't have (for now) – Save it for v2.
Tie every feature back to a user story:
“As a [freelancer], I want to [start a timer], so I can [track hours for a client].”

Begin building with just the "must-haves." Each feature you include should be linked to reducing user effort, solving the main problem, or increasing adoption.
If it doesn't do one of those three things, it's out.
This phase often benefits from visual feature-mapping sessions with sticky notes or digital boards like Miro.
Collaborative sorting frequently reveals what's essential versus what's noise. A clear view here helps when you develop custom MVP products that don't bloat beyond necessity.
Step 4: Sketch the User Flow
A straightforward user journey prevents confusion and friction. Start when someone opens your product to when they complete the key task.
Use simple diagrams (even hand-drawn). Example user flow
- Open app
- Sign up
- Create a task
- Assign a due date
- Mark the task as complete
That's it. Every step should be intuitive, with no dead ends. Fewer steps = faster value delivery.
Ask yourself: Can a user complete the main task in under 3 minutes?
If not, trim the flow. In how you develop custom MVP products, simplicity is often more valuable than flexibility.
Layer interaction context on top of this journey. Are users likely to engage from mobile or desktop?
Will they have distractions (e.g., on the move) or be focused (e.g., at a desk)? These inputs help decide how prominent buttons or detailed tooltips should be.
Revisiting this flow after initial design sketches can help realign product simplicity. Every detour or hesitation in the process is a potential reason a user might churn. Keep it smooth
Step 5: Choose the Right Tech Stack
Your tech stack shouldn't slow you down. Use tools that match your team's expertise and let you build fast
Common MVP stack examples:
- Frontend: React, Vue
- Backend: Node.js, Django
- Database: Firebase, PostgreSQL
- Hosting: Vercel, Heroku, AWS
The stack you choose should support your goals, not impress your peers.
Constantly assess the tradeoffs. Firebase might speed you up with built-in auth and cloud functions, but vendor lock-in could limit you later. On the other hand, self-hosted Postgres might give long-term flexibility but take longer to deploy.
Choose modular components. This lets you swap parts out later when scaling. It's a key advantage when you develop custom MVP products built to adapt, not just to launch.
Want to launch your MVP faster without code?
AppsRhino builds custom apps for your enterprise with low-code no-code tools like Joget, Bubble, & more.
Step 6: Build the MVP (Design + Development)
Now, the real work begins. Split your process into two phases:

1. Design Phase
Start with wireframes. Use Figma or Balsamiq to map layouts before touching the code. Focus on:
- Clear layout
- Easy navigation
- Simple color schemes
Design for your audience's context.
For example, when you develop custom MVP product flows tailored to specific user environments, usability improves dramatically.
A logistics manager on a mobile needs oversized buttons. A student might need fewer distractions.
Validate early with mockup walkthroughs. Share Figma links with target users. Ask: "Would you know what to do next on this screen?" Use those reactions to guide visual hierarchy.
2. Development Phase
Begin with the backend—set up databases, APIs, and user authentication. Then, move to the front end, building screens one by one.
Use version control from day one. Deploy each working version, even fundamental, so you always have a fallback.
Build your MVP iteratively. Don't block frontend work while waiting on the final backend logic. Use mock data. Stub endpoints.
Ship working experiences, even if the plumbing isn't final. This is what helps teams develop custom MVP products under real-world deadlines.
Step 7: Test with Real Users
Internal testing helps you catch bugs, but only real users will reveal usability issues and valid friction points.
After building your MVP, share it with a small group of target users: ideally, the personas you defined earlier.
Aim for about 10 to 20 people who represent your ideal customer segment when you develop custom MVP products.
Use tools like Loom or Hotjar to record screen sessions and capture user behavior in real-time. Observe how they navigate through your MVP:
- Are they hesitating before clicking a button?
- Do they skip key steps or get stuck at specific points?
- Do they complete the flow smoothly or seem lost?
Behavior is often more honest than feedback alone, which makes it crucial in the early stages of building a custom MVP.
Create a structured test plan before your session:
Objective: Test task assignment flow for the HR dashboard
Testers: 15 HR managers from mid-sized firms
Instructions: Assign a task, set a due date, and mark complete
Tools: Screen recording, feedback form (Google Forms)
Be specific in your instructions. Ask users to complete a task representing your product's core value. For example: ‘Log in and assign a task to a team member.’ Watch for confusion or drop-offs during that journey to help refine how you develop custom MVP products with seamless interaction.
After testing, send short surveys or schedule feedback calls to dive deeper. Ask what they liked, what confused them, and what they expected to happen that didn't.
This type of real-time validation is essential to fine-tune features and fix blockers before you further scale and develop custom MVP products.
Step 8: Launch and Collect Feedback
A full-scale launch isn't the goal yet. Aim for a controlled release, a soft launch, to a limited group at this stage.
The objective is learning one of the core principles when you develop custom MVP products.
Build a simple feedback mechanism into your MVP:
- A "What can we improve?" button on key screens
- An optional 3-question form after a completed action
- Email follow-ups asking users about their experience
Make it easy for users to share their thoughts. Include an always-visible button for comments and follow up with brief surveys. Collect both qualitative and quantitative data. Watch metrics like:
- User retention – Do people return after first use?
- Feature usage – Which actions are most common?
- Drop-off points – Where are users quitting the flow?
Also, track user sentiment. What words do they use when describing your product? Are they excited or frustrated? Do they recommend it?
These qualitative signals can be just as telling as the numbers and can guide whether to add features, make UX tweaks, or refine onboarding when you develop custom MVP products.
Use tools like Google Analytics, Mixpanel, or PostHog to measure engagement and conversion. These platforms help visualize patterns that may not be obvious from user interviews alone.
A strong feedback loop during this soft launch period enables teams to adapt quickly. This agility is one of the most important reasons why businesses prefer to develop custom MVP products instead of full-fledged products from day one.
Step 9: Analyze and Plan Next Steps

Once feedback has been collected, it's time to sit down and analyze. Break the data into categories:
- Bugs – Broken flows or crashes
- UX issues – Confusing labels or poor layouts
- Feature requests – Ideas from users
- Silent misses – Features that went unnoticed entirely
Look for patterns that consistently emerge across your early user base to guide improvements as you develop custom MVP products iteratively.
Did the MVP solve the core problem? If yes, great—build on what works. If not, ask why.
Was the solution unclear? Were users not who you expected? Or was the problem more minor than imagined?
These insights inform design choices and whether your product direction needs reevaluation.
Consider a scoring matrix to prioritize the following steps
- Urgency – How pressing is the issue?
- Impact – Will fixing this significantly improve the user experience?
- Effort – Is the fix quick or complex?
Map each insight to a possible action. If users abandon the signup screen, consider simplifying the form. If no one used a feature you thought was critical, it isn't. Let the data, not assumptions, shape your roadmap. This is the true test of your ability to develop custom MVP products with traction.
You can confidently decide: improve, pivot, or scale from here. These decisions mark the transformation of a basic MVP into a scalable product and underscore the importance of choosing to develop custom MVP products in a strategic, feedback-driven way.
Bonus Tips for MVP Success
By now, you've worked to plan, build, and test your MVP. But even seasoned tech founders need constant reminders of what makes MVPs effective.
When you develop custom MVP product strategies, it's easy to forget that simplicity and speed often outperform perfection.
These final tips distill the real-world habits of product teams that thrive—and make sure your journey doesn't stall after launch.
Here's what sets strong MVPs apart:
- Speed wins. Done is better than perfect. The faster you launch, the quicker you learn. Delaying launch to polish features often leads to wasted development and slower user validation.
- Feedback is fuel. Watch behavior more than you listen to opinions. People may say one thing and do another—trust accurate usage metrics more than theoretical comments.
- Stay lean. Use no-code tools like AppsRhino to rapidly build and iterate, especially for testing ideas, internal tools, or marketing workflows.
- Don't build for everyone. One audience. One problem. One core function. That's enough. Serving everyone early on usually results in a product that delights no one.
Your MVP Journey Starts Here
To develop custom MVP products is to build lean, validate fast, and grow based on truth, not assumptions. It's about reducing waste and focusing every decision on real user needs.
By stripping your idea to its core, testing early, and iterating based on insight, you set a foundation for long-term product success in today's fast-paced, feedback-driven world.
If you want to bring your idea to life quickly and affordably, check out AppsRhino’s Custom App Development Services. Their low-code MVP solutions help founders build and launch custom products without the hassle of traditional development cycles. It's the most innovative way to develop custom MVP products today.
Frequently Asked Questions (FAQs)
What tools help develop custom MVP products fast?
Use no-code tools like AppsRhino or Bubble to develop custom MVP products quickly. They offer prebuilt modules, saving time on design, backend, and integrations.
How do you present an MVP?
Show a clear problem-solution demo. Focus on core features, honest user feedback, and data. Please keep it simple to highlight why you chose to develop custom MVP products leanly.
What mistakes delay MVP success?
Adding too many features, skipping user testing, or not solving a real problem can fail your efforts to develop custom MVP products effectively.
How do I get early feedback?
Launch a soft beta. Use short surveys, screen recordings, and interviews. This ensures that what you develop custom MVP products for resonates with real users.
How do you market an MVP?
Target niche communities, run low-budget ads, and use waitlists. Keep messaging tied to the problem you solve when you develop custom MVP products.
What comes after MVP validation?
Once validated, scale gradually—improve UX, add top-requested features, and expand marketing. Don't rush. Build upon your efforts to develop custom MVP products with purpose.
Share blog
Related Quick Blogs
Table of Contents
- Why You Should Build a Custom MVP ?
- Bonus Tips for MVP Success
- Your MVP Journey Starts Here
- Frequently Asked Questions (FAQs)